

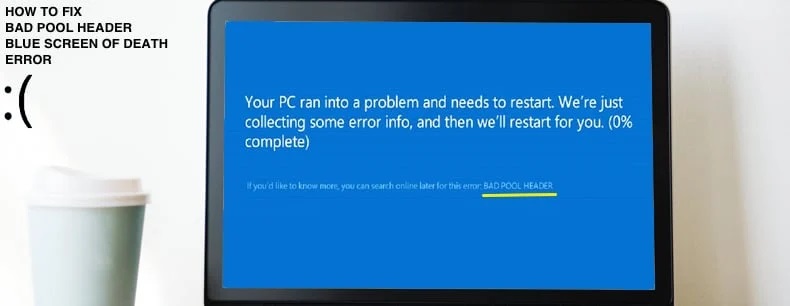
This article explains Fix Bad Pool Header Error in Windows 10. The blue-screen with the Bad Pool Header on it may appear to be the end of Windows, but it is not. 0x00000019 is the error code associated with this pool problem. When the pool header in Windows 10 becomes corrupted, you get a bad pool header. A corrupted pool header can be fixed with a few simple adjustments. Well, before we go into the repairs, it’s vital to understand the error’s specifics.
Top 18 Ways To Fix Bad Pool Header Error in Windows 10 in 2022
In this article,you know about Fix Bad Pool Header Error in Windows 10 here are details below;
In Windows 10, what is a Bad Pool Header?
A bad pool header is caused by a memory allocation error. The Windows API is not given enough memory by the Windows system (Application Program Interface). A pool error warning appears on the Blue Screen of Death (BSOD). A bad pool header issue might occur for a variety of reasons.
• Newly connected devices
• Newly installed software
• Corrupt drivers
• Bad sectors on the hard drive
• Third-party antivirus
• Corrupt or damaged system files are only a few examples.
The explanation for this varies depending on your Windows operating system. To solve the bad pool header in Windows 10, you can try the several alternatives listed below.
The Top 18 Ways to Repair a bad Pool Header in Windows 10
Some people may be able to log onto Windows properly, while others may not. To help you with the bad pool header error in Windows 10, we’ve identified three different scenarios. You can make reference to the situation you’re in. You can try all of the solutions listed below if you can log in to Windows.
Scenario 1: Stuck on Blue Screen indefinitely
If your PC is stuck on the Blue Screen of Death and you are unable to do anything, try the methods listed below for a bad pool header in Windows 10. If your power button isn’t working, try the option listed below.
1. Disconnect all external devices.
Windows memory management can be hampered by an external device linked to the system. All external devices, such as USB drives, external hard drives, webcams, CDs, and flash drives, should be removed. After you’ve unplugged all of your devices, restart your computer to see if the problem has been repaired.
2. Remove Recently added Hardware
If you’ve recently introduced a new hardware component to your PC, you’ll need to temporarily remove it. Any fresh RAM, keyboard, mouse, or hard drive can be used as the component. If the components aren’t compatible or configured appropriately, you may encounter a bad pool header problem.
If the problem is addressed, you can have the required hardware replaced at the store where you purchased it.
3. Remove any dust from the RAM.
A layer of dust on your RAM can sometimes exacerbate Windows-related issues. You can only remove the stick if you are an expert at it. Remove the RAM sticks, clean them, then reinstall them. Now see if you can restart your computer.
Scenario 2: Windows Login Permission
Some of you may be surprised by this scenario if you’re trapped on a blue screen. However, the bad pool header in Windows 10 can appear at random intervals when you log in to the machine. In this case, you can choose from a broad number of options listed below.
1. Remove any third-party antivirus software.
Third-party antivirus software might occasionally cause memory problems. You can briefly turn off antivirus to see if the issue goes away. If it happens, you must uninstall the antivirus software from your computer. After the uninstall, restart your computer. Also check Discord overlay not working
If your antivirus was a problem, you’ll need to find a replacement. You can also contact customer service representatives to resolve your problem.
2. Uninstall any software that was recently installed.
Some apps, as well as the Windows memory pool, might consume a lot of system resources. Many of us have a habit of installing software on a regular basis, which can cause problems with your system. If you’ve recently installed any new software, you’ll need to uninstall it first. Check if the problem with the bad pool header in Windows 10 has been fixed after removing the app.
3. Turn off the Fast Startup feature.
When you enable rapid startup, the kernel session is hibernated rather than shut down. As a result, the PC can be started in less time. The quick startup, on the other hand, may cause problems with Windows memory management. Fast startup is enabled by default in Windows, therefore you must disable it manually. To disable rapid startup, you’ll need an admin account.
Step 1: In the search menu, type power and then select Power & Sleep Settings.
Step 2: Select Additional power options from the drop-down menu.
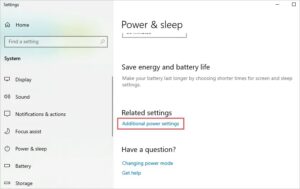
Select Additional power options from the drop-down menu.

Step 3: Select Choose what the power buttons do from the left panel.

Choose what the power buttons do by clicking on Choose what the power buttons do.

Step 4: Uncheck the box next to Turn on rapid startup in the following window. To save your modifications to your Windows 10 system, click Save changes.
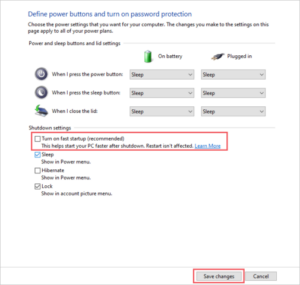
Disable Uncheck the box to enable rapid startup.

After that, restart your computer and observe whether the BSOD with a bad pool header appears again in Windows 10.
4. Use Memory Diagnosis to check your memory.
As previously stated, a memory issue can result in a stop code known as bad pool header.
Windows Memory Diagnosis can assist you in determining whether or not there are any errors in the system RAM. Because the diagnosis is performed outside of Windows, you will need to restart your computer. So, before you begin, we urge that you save all of your previous work.
Step 1: In the search menu, type memory diagnostic and then select Windows Memory Diagnostic from the list of results.
Step 2: When the memory diagnostic box displays on the computer, select Restart now and run a test to see if there are any issues.
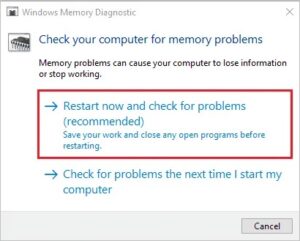
To begin the memory test, click Restart Now.

Your computer will restart and check for RAM problems. When your computer restarts, it will display the test results. After that, you can have your RAM replaced or fixed as needed.
5. Drivers must be updated
Your Windows PC could be hampered by outdated drivers. Because of the obsolete drivers, you can obtain a bad pool header on Windows 10. As a result, you can use the Windows Device Manager to update your drivers.
You can manually update drivers or have a driver updater do it for you. Our device driver tutorial will walk you through the steps in detail.
6. Turn off indexing
Indexing can help you find information faster. It does, however, set aside system resources for it. You can disable indexing if Windows is having trouble allocating memory. This will conserve system resources such as RAM.
Follow the actions outlined below to turn off indexing. To disable indexing, you must log in to the admin account.
Step 1: Open Run by pressing Windows key + R, then typing services.msc. Click the OK button.
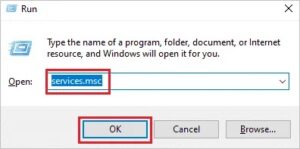
To open services, type services.msc in Run.

Step 2: Once the services are up and running, look for Windows Search and double-click it (You can also right-click on it and select Properties from the context menu).
Step 3: Select Disabled or Manual from the Startup Type drop-down menu.
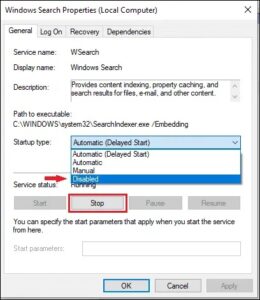
The Windows Search service should be turned off.

After you’ve disabled indexing, restart your computer and see if you’re still getting a bad pool header in Windows 10.
7. Remove Recent Updates
Memory problems can occur as a result of a Windows upgrade. If everything was great before to the Windows update, it’s possible that the new Windows update is incompatible with your device or that it has flaws.
You can uninstall the most recent update and see if everything returns to normal.
Step 1: To access Settings, press Windows key + I and select Update & Security.
Step 2: Select Windows Update from the left panel. Select View Update History from the Windows Update menu.
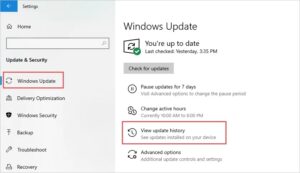
To see the most recent Windows update, go to View update history.

Step 3: Select Uninstall updates from the drop-down menu.
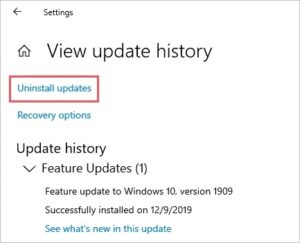
Uninstall updates by clicking on it.

Step 4: Go to Microsoft Windows and scroll down. Uninstall the most current update by right-clicking on it.
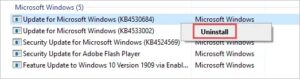
Remove the most recent Microsoft update.

After you’ve uninstalled the update, restart your Windows PC and see whether the bad pool header problem reappears. Also check Discord audio cutting out
Note: In the next update, your PC will have an uninstalled update. As a result, you don’t have to be concerned about the uninstalled update.
8. Carry out a Clean Boot.
When you execute a clean boot, Windows starts up with only the apps and drivers that are essential. So, if the problem is with the existing software, you can use the clean boot to fix it. Follow the steps outlined below to complete a clean boot.
Step 1: In the start menu, type system config and then select System Configuration from the search results.
Step 2: Select the Services tab, and then select Hide all Microsoft services from the drop-down menu. Finally, select Disable all.
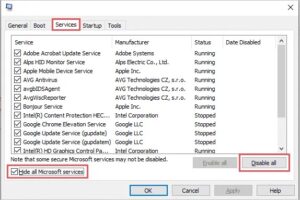
Turn off all non-Microsoft services.

Step 3: Go to Startup tab & select the Open Task Manager option.
Step 4: Select each task and then click Disable. It must be repeated for each task.
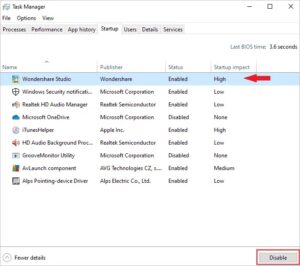
Turn off the task.

Step 5: When you’re finished, quit Task Manager and go to System Configuration and click OK.
Step 6: When you’re finished, restart your computer.
Check to see if Bad Pool Header error appears again. If you still don’t receive it, try enabling each service one at a time until you locate the problem. You can remove the software that is causing the problem.
9. Install the latest Windows updates
We already advised you to uninstall the most recent update. If you still have a problem with a bad pool header in Windows 10, you can try updating Windows. The latest uninstalled version of Windows may have been fixed by the new update.
Navigate to Update & Security in Settings to update Windows.
Click on Windows Update in the left panel,then on Check for Updates.
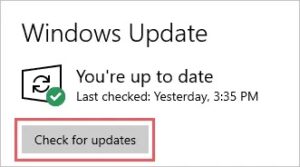
Check for updates in Windows and, if any are available, download and install them. Restart your Windows PC and see whether the memory allocation problems reappeared.

10. Disable Drivers
The drivers also consume system resources and can occasionally increase the amount of memory used by the system. On Windows 10, you can temporarily disable all drivers to see if a bad pool header is fixed.
From the Device Manager, you can disable all of the drivers. Refer to our Device Driver guide for further information on disabling the driver. If the problem goes away after you disable the drivers, you’ll need to enable them one by one to locate the cause.
11. Restart your computer
If none of any other options works for you, you might try restarting your computer. Windows gives you the option of resetting your computer to factory defaults. This removes all of your installed apps and software and restores your PC to the state it was in when you bought it.
Reset PC features a feature that allows you to keep your files and folders. It does, however, remove programmes and software. To Reset the PC, go to Settings Update & Security Recovery (from the left panel) and select Get started under Reset this PC from the drop-down menu.
To reset the computer, click Get started.
To complete the factory reset, follow the directions on the screen. Check to see if your computer works normally after the reset.
Scenario 3: The Power Button Doesn’t Work
If you can switch off your computer, there are several additional troubleshooting options you can take to fix the bad pool header in Windows 10.
To enter repair mode, restart your computer by pressing the power button. Press the power button once more when you see the start screen/manufacturer logo. Repeat the process until Preparing Automatic Repair appears on your screen.
Navigate to Troubleshoot Advanced options once you’ve reached the repair screen. The command prompt may be found in Advanced Options, where you can run the commands listed below. You can find a system restore option under Advanced settings, which can assist you in restoring the system. Also check discord red dot icon
You can also use the Advanced settings Startup Settings to enter safe mode and run the command from there.
1. Run the SFC command.
The system files are vital to the system’s performance. If any of the system files are broken or damaged, the Windows system may encounter stop code problems, such as a bad pool header.
Regardless of whether you can access the system or not, you can rapidly check for system files. To inspect and replace damaged system files, use the sfc /scannow command. More information about the SFC command can be found in our handbook.
2. Run the command chkdsk
If you’re still getting BSODs on a regular basis, you should inspect your hard discs for any bad sectors. The chkdsk command performs a check of your hard drives and also repairs any bad sectors. If you have a bad pool header due to bad sectors or logical faults, you can use chkdsk to repair it.
Step 1: If you’re authorised to log in to Windows, go to the search menu and type cmd.
Right click Command Prompt in the search results & select Run as administrator.
As an administrator, open the Command Prompt.
Step 2: Type the command shown below into the command prompt and press Enter.
/r chkdsk
The command above will scan your hard drives for bad sectors and logical faults, as well as repair them.
3. Restore the system
You can now use the restore point you created previously to help you. You can revert your system to a previous state where everything was working properly. To learn how to do it, read our entire guide to System Restore.
You can reset your PC if you don’t have any system restore points.
4. Run a fresh Windows installation
Installing Windows is the last choice for fixing a bad pool header in Windows 10. Install Windows from bootable media if your laptop/PC is stuck on the blue screen and you are unable to do anything.
Conclusion
The BSOD can be very troublesome at times. Minor fixes, on the other hand, can address the stop code problem if the hardware or software issue isn’t too serious. As previously stated, memory management concerns in Windows 10 are the cause of the bad pool header. As a result, eliminating the external gadgets may be beneficial in some cases.
The criticality of the problem influences the solutions. You may lose data in some circumstances; thus, backups or restoration points should be available.